

Preview
Click on the image below to see the final result in full scale. 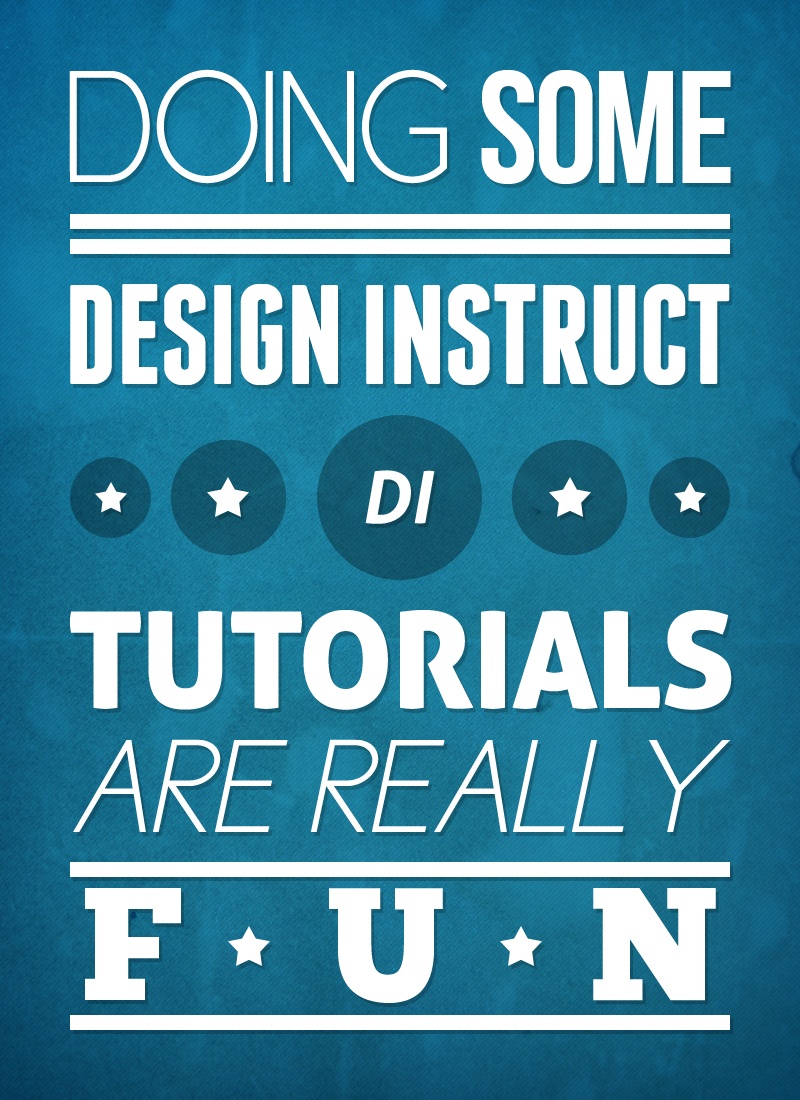
Tutorial Resources
- Texture: Grungy Paper 01 (Jacob Gube)
- Pattern: 20 Repeatable Pixel Patterns (Orman Clark)
- Font: Cicle
- Font: Bebas Neue
- Font: Franchise
- Font: Aller
- Font: ChunkFive
Step 1: Create the Photoshop Document
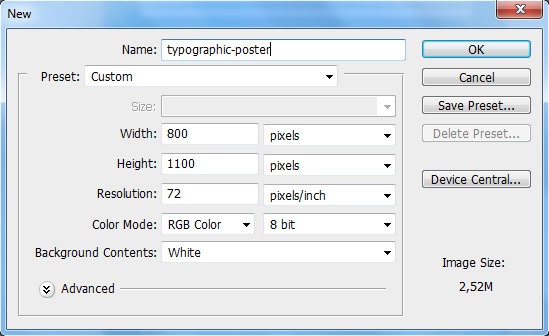
Let’s start by creating a new document. Press Ctrl/Cmd + N and set the document size to 800x1100px with a white background. Note: If your work will be printed, you’ll need a high resolution (at least 300dpi) and you should use CMYK color mode.
Step 2: Create the Blue Gradient Background
Double-click on the Background layer to unlock it. Choose the Gradient Tool (G) and set the gradient colors to #229EB7 and #186978. 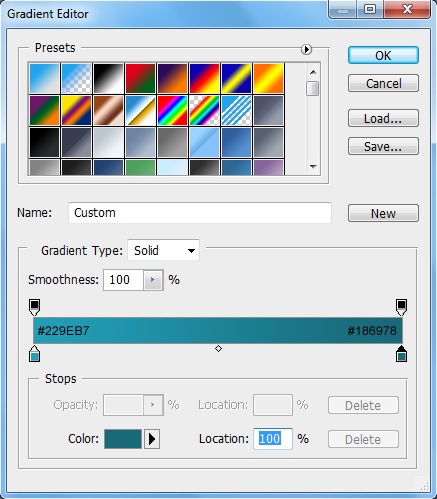 Now create the gradient from the top left corner to the bottom right corner of the canvas.
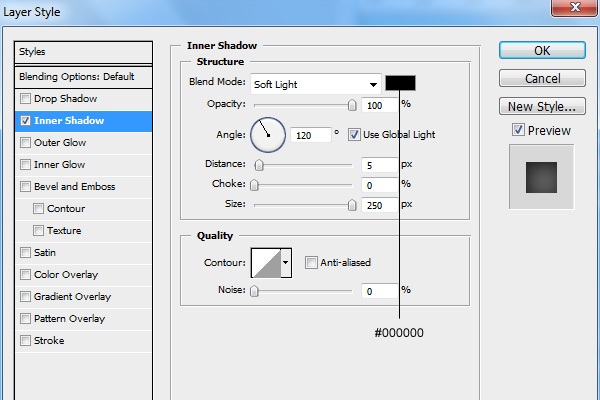
 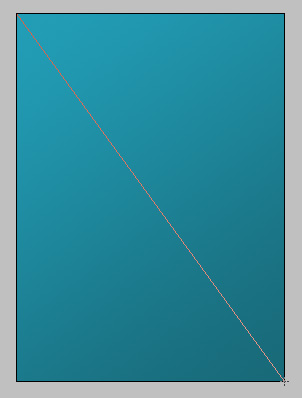 Right-click on the layer and select Blending Options from the contextual menu that appears; this is one way of accessing the Layer Styles dialog window. Apply the Inner Shadow layer effect using the settings shown below.
 Create a new layer (Shift + Ctrl/Cmd + N) and then name it “Blue”. After that, choose the Gradient Tool (G) again and set your gradient colors to #2F5E9E and #5792D1.
 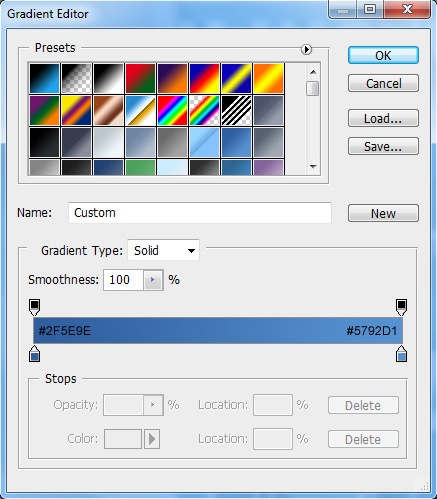 Fill the “Blue” layer with the gradient starting from the top left corner and finishing at the bottom right corner of the canvas.
 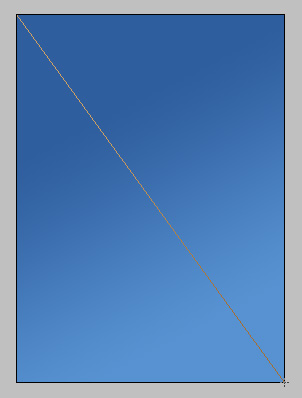 Set the “Blue” layer’s Blend Mode to Soft Light to achieve a more vivid and interesting background color.
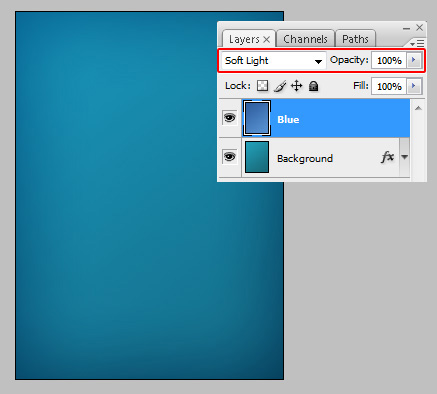
Step 3: Add Texture to the Blue Background
Now go to the High-Resolution Grungy Paper Textures download page on Six Revisions and then download the first texture called Grungy Paper 01.
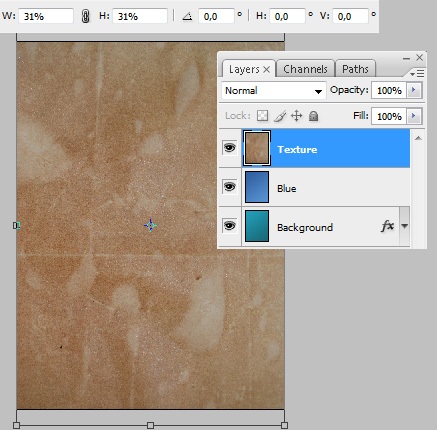
Open it in Photoshop and, using the Move Tool (V), drag it into our main document. Rename the layer to “Texture” and make sure it’s placed right above the “Blue” layer. Next, press Ctrl/Cmd + T to activate Free Transform, and then reduce the width and height to about 31%, making it fit perfectly in our canvas.
 Next, download the 20 Repeatable Pixel Patterns pattern library and install it. Tip: If you’re not familiar with Photoshop patterns, learn all about them by reading the following: Photoshop Patterns: Ultimate Guide. After installing the Photoshop pattern library, choose the Paint Bucket Tool (G) and, in the Options Bar, select Pattern as the fill type and choose pixelpattern2 from the pattern library we installed.
Create a new layer (Shift + Ctrl/Cmd + N) called “Pattern” and use the Paint Bucket Tool to fill it with the selected pixel pattern. Then, reduce the “Pattern” layer’s Opacity to 10%. 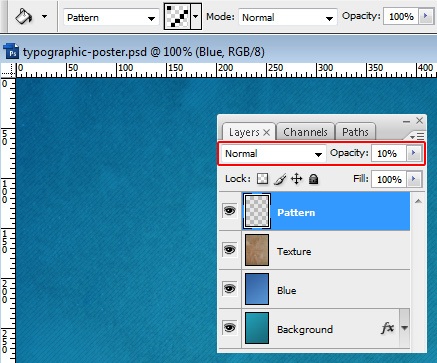 In the Layers Panel, select all 4 layers and go to Layer > New > Group from Layers to create a layer group for our poster’s background.
Name the layer group “Background”.
Step 4: Adding Photoshop Guides
When working with design layouts, and especially those that involve text blocks, Photoshop guides will help you by making it easier to align your design components. Let’s add 4 guides. To add a guide, you can go to View > New Guide.
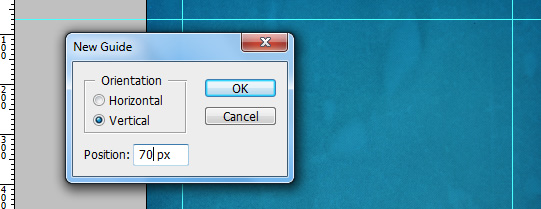 Add 2 vertical guides at 70px and 730px. Then, add 2 horizontal guides at 70px and 1030px.
Step 5: Add Some Text to the Poster
First, to keep our work organized, we’ll create a new group (Layer > New > Group) called “Typography” for all of our text.
See the list of fonts used in this tutorial under Tutorial Resources at the top. Tip: Feel free to use your preferred fonts. After creating the “Typography” layer group, we’re ready to start adding some text.
First, set you Foreground color to white (#FFFFFF). Switch to the Horizontal Type Tool (T), choose Cicle (Fina) as your font and set the font size to about 160pt (do this in the Options Bar) and then write the word “DOING”. Then go to Window > Character to open the Character Panel (if it isn’t opened already) and set the Tracking option to -25, which will reduce the spaces between the characters. 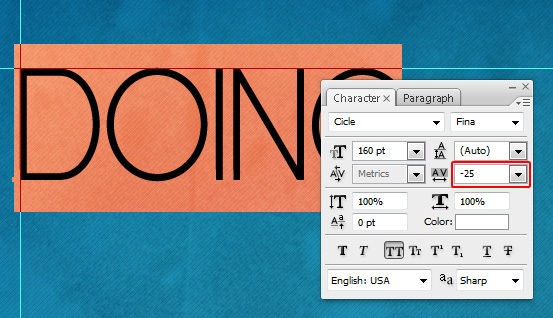 Now choose Bebas Neue (Regular) at 160pt size font and write the word “SOME”. In the Character Panel, set the Tracking option to -25 as well.
 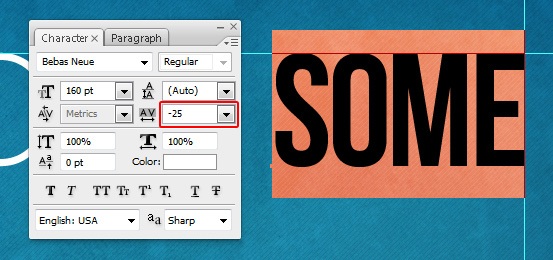 Grab the Rectangle Tool (U) and draw a rectangle at 15px height below our text; use our vertical guides as a reference for the width of the rectangle. Place it about 30px below our text.
This rectangle serves as an underline on our text.  Duplicate the underline layer by pressing Ctrl/Cmd + J and move it about 10px below the first underline.
 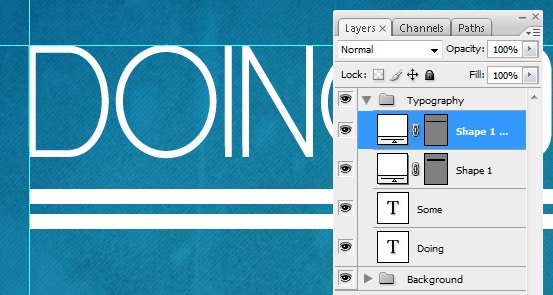 Switch back to the Horizontal Type Tool (T), set the font to Franchise at 142pt size and write out “DESIGN INSTRUCT” below the two underlines.
In the Character Panel, set the Tracking to -10. 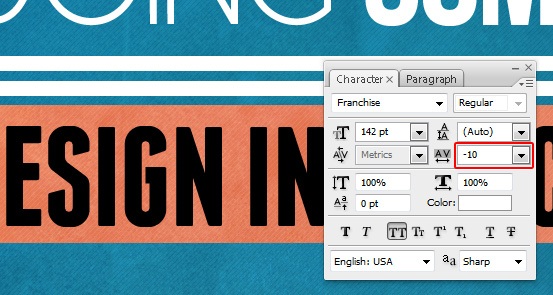 Place the text about 30px below the second horizontal line, keeping our line heights consistent thus far.
 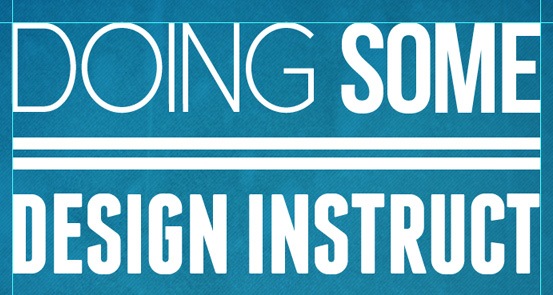 We’ll be adding more text later, but let’s move on to another component of our poster before that.
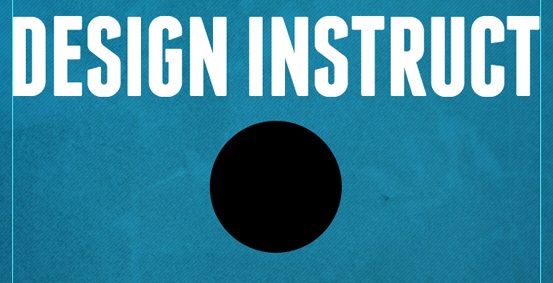
Step 6: Create the Circles Design Element
To spice up our poster, we’ll add some circles as a design element in our composition.
First, change your Foreground color to black (#000000), then pick the Ellipse Tool (U). After that, hold down Shift (which ensures you’re drawing a perfect circle) and then draw a 165x165px circle. Align the circle so that it’s horizontally centered and about 35px below the “DESIGN INSTRUCT” text.
 Press Ctrl/Cmd + J 4 times to duplicate the circle layer. You should now have 5 circles at this point. After that, press Ctrl/Cmd + T to activate free transform and resize 4 of the black circles to about 70% of the original size.
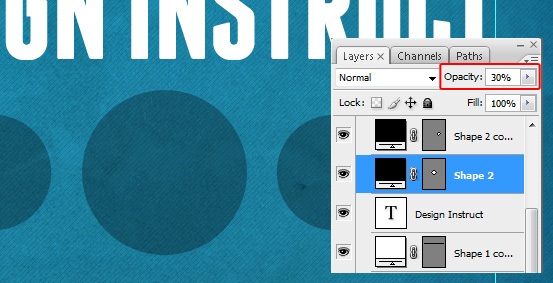
Then pick 2 of the 4 resized circles and resize them down to 70% again. Arrange them to stand side by side. 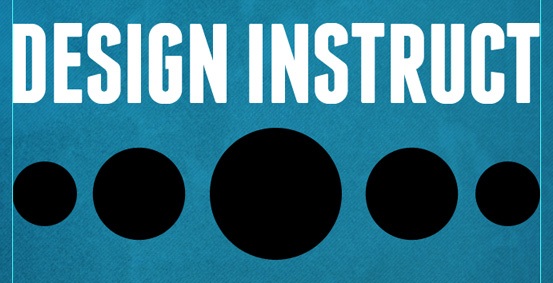 Afterwards, reduce the circles’ layer opacities to 30% to make the background texture show through.
 Change your Foreground color to white (#FFFFFF) and then switch to the Custom Shape Tool (U). In the Options Bar, in the Shape dropdown menu, choose the shape named 5 Point Star, and then draw a 30x30px star on top of the leftmost circle.
  After that, draw a bigger star at the center of the next circle.
 Duplicate both stars and place the duplicates at the center of the two other circles on the right.
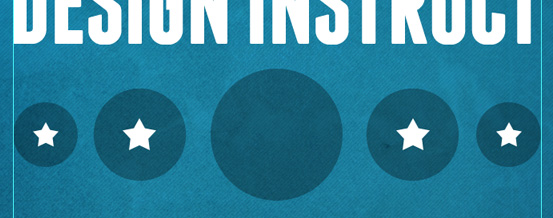
Step 7: Adding More Text
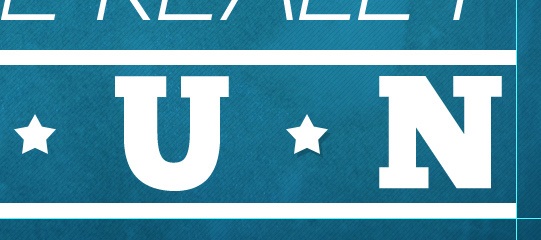
Let’s continue adding more text. Use the Horizontal Type Tool (T) with Aller (Bold Italic) at 72pt size and 0 Tracking to write “DI”. Place the text at the center of the biggest circle. 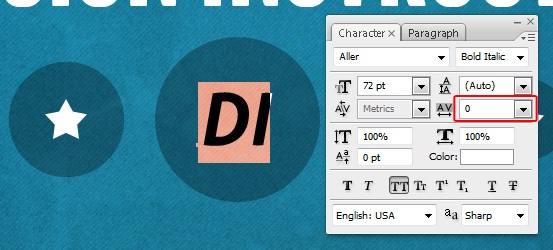 Choose Aller (Display) at 134pt size and -10 Tracking, and then write “TUTORIALS”. Place it 30px below the biggest circle.
  Change the font to Cicle (Fina Italic) at 134pt size and write “ARE REALLY”, then set the Tracking to -10 and place it 30px below the word “TUTORIALS”.
 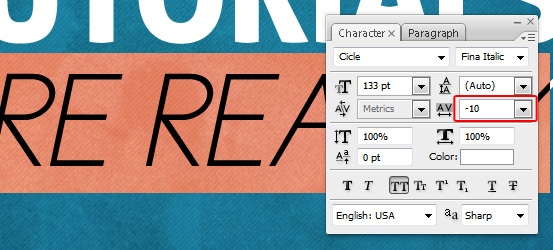 Now find one of the underline layers we created earlier, duplicate it (Ctrl/Cmd + J) and then move the duplicate underline 30px below the text. After that, duplicate the underline layer again and place the duplicate so that it sits just above the horizontal guide at the bottom of the canvas.
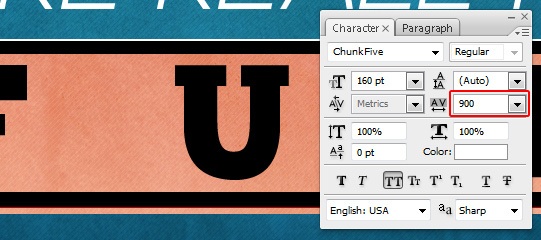
 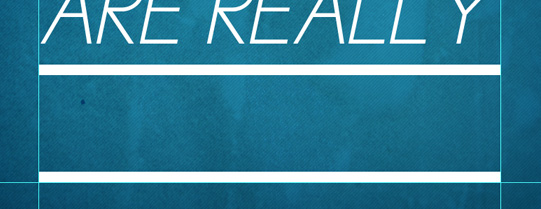 Choose ChunkFive font at 160pt size and write “FUN”, then set the Tracking to 900 and place it about 12px above the underline at the bottom.
 Find one of the bigger star shape layers that we created earlier for the circles design element, duplicate it twice and then move the duplicates into the gaps between the letters.
Step 8: Adding Drop Shadows
For our final step, we’ll give some of the poster’s text and shapes drop shadows using layer styles. First, give the stars that are in the gaps between the word “Fun” a Drop Shadow layer effect.
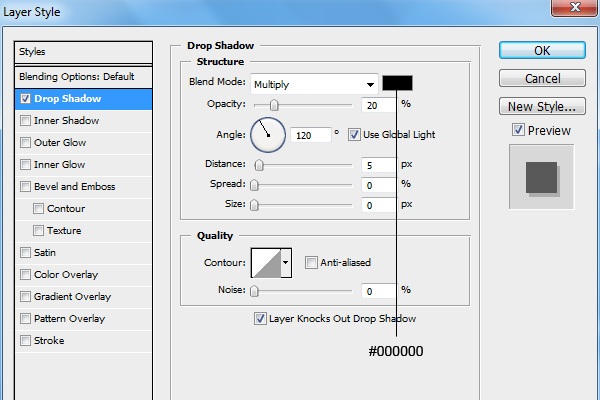
 Then, in the Layers Panel, right-click on one of the star layers with the drop shadow and then choose Copy Layer Style from the contextual menu that appears. Select all the layers inside the “Typography” layer group except the circle shapes, right-click on one of the selected layers, and then choose Paste Layer Style. This will copy the Drop Shadow layer effect on all the selected text and shape layers.

Tutorial Summary
Congratulations, we’ve finished our typographic poster design! We covered some useful and trendy techniques like how to create a detailed and textured background, how to customize fonts in the Character Panel, how to use the Custom Shape Tool for adding interesting design elements easily, and more. I hope you have found this tutorial to be useful and have discovered some techniques that will help you in future projects.
Below you can see the final result, which I’ve placed on a wooden background.
Download Source Files
- simple_textured_typographic_poster (ZIP, 4.44 MB)
-
 Trevin serves as the VP of Marketing at WebFX. He has worked on over 450 marketing campaigns and has been building websites for over 25 years. His work has been featured by Search Engine Land, USA Today, Fast Company and Inc.
 -

WebFX is a full-service marketing agency with 1,100+ client reviews and a 4.9-star rating on Clutch! Find out how our expert team and revenue-accelerating tech can drive results for you! Learn more
Make estimating web design costs easy
Website design costs can be tricky to nail down. Get an instant estimate for a custom web design with our free website design cost calculator!
Try Our Free Web Design Cost Calculator
Table of Contents
- Preview
- Tutorial Resources
- Step 1: Create the Photoshop Document
- Step 2: Create the Blue Gradient Background
- Step 3: Add Texture to the Blue Background
- Step 4: Adding Photoshop Guides
- Step 5: Add Some Text to the Poster
- Step 6: Create the Circles Design Element
- Step 7: Adding More Text
- Step 8: Adding Drop Shadows
- Tutorial Summary
- Download Source Files
Share this article


Web Design Calculator
Use our free tool to get a free, instant quote in under 60 seconds.
View Web Design CalculatorMake estimating web design costs easy
Website design costs can be tricky to nail down. Get an instant estimate for a custom web design with our free website design cost calculator!
Try Our Free Web Design Cost Calculator


